Home » Articles posted by David Walker
Author Archives: David Walker
Construction Site Security Cameras Improve Productivity and Efficiency
Security cameras are a powerful deterrent against theft and vandalism by showing criminals that the site is being monitored. This is especially effective when the camera systems are positioned at high vantage points and are visible.

Additionally, remote monitoring capabilities are a must-have for construction sites. This allows project managers and security personnel to access real-time footage from anywhere, allowing quicker response times in an emergency. Keep reading the article below to learn more about Construction Site Security Cameras.
The visible presence of surveillance cameras on a construction site acts as an immediate deterrent to would-be thieves. Ensure that cameras are visibly placed to cover entry and exit points, as well as high-risk areas, so there are no blind spots. Consider opting for cameras with audio capabilities as well. These cameras can notify you when a trespasser is detected, and many models can even sound an alarm or flash strobe lights to scare away the intruder.
Resolution is a key consideration for construction site security cameras, as the higher the resolution, the more detail an image will contain. Choose a camera with a minimum resolution of 720p or higher to capture clear footage of people and vehicles. Some advanced surveillance cameras also feature thermal imaging to detect heat signatures, allowing you to identify intruders even in complete darkness.
Whether you’re looking for an integrated solution or a stand-alone camera, opt for a model that offers tamper detection to help reduce the likelihood of false alarms. This feature can send instant notifications to your smartphone or tablet when a camera has been tampered with, enabling you to take action promptly.
Cameras with infrared technology are an excellent choice for construction sites, as they’re designed to work effectively in conditions of low lighting. Look for a model that boasts features like starlight night vision and two-way audio to enhance the camera’s ability to deter crime and other issues on construction sites.
A construction site is a high-risk area for theft, and a quality surveillance system can significantly improve the safety of your workers and prevent costly equipment loss. To make sure your surveillance system is secure, choose a model that includes features like encryption and secure communication protocols to protect sensitive data.
Some models of security cameras allow you to store video footage in the cloud rather than on a local server, reducing your risk of privacy breaches and other potential hazards. Other camera options include wireless, cellular-based or solar-powered construction site security cameras to address connection and power issues common in remote locations. For example, a 4G mobile camera from Reolink Go is a great option for construction sites with limited connectivity. It uses the cellular network to provide around-the-clock surveillance, and it can be powered with a rechargeable battery or solar panel for continuous power.
Detection
Construction security cameras are effective tools for protecting your site from criminal activity, but they also offer useful insights into productivity and efficiency. By monitoring your construction site from a bird’s-eye view, you can identify bottlenecks in workflow, optimize processes, and improve project outcomes.
The best security camera systems are capable of detecting motion and delivering real-time alerts to your mobile device or monitor in the control room. Look for motion detection technology that offers adjustable sensitivity levels to reduce false alarms caused by natural elements like wind-blown debris. This feature can be especially helpful for protecting sensitive equipment that is vulnerable to damage from vandalism or theft.
Invest in cameras with high-definition video quality to identify vehicles, people, and objects clearly. A high-quality camera can also be valuable in case of a legal dispute or investigation.
Choose a camera that is weather-resistant to guard against rain, snow, and other outdoor conditions. Additionally, consider selecting cameras with anti-vandal features and tamper-resistant designs to prevent unauthorized access and repairs.
A battery-powered camera is a good option for construction sites that lack stable electrical infrastructure or are located in remote locations. These cameras use rechargeable batteries to operate, making them a more sustainable solution than wired cameras that run on hard-wired electrical power.
Many areas require you to obtain permits before installing surveillance cameras on construction sites. This process may include submitting detailed plans of camera locations and data storage policies to ensure compliance with local laws regarding privacy. Obtaining these permissions can help you avoid potential legal entanglements down the road.
Consider implementing surveillance systems that offer remote monitoring and mobile access to allow you to keep an eye on your construction site at all times. This allows you to respond quickly to incidents, minimizing the likelihood of property loss or damage.
Once you’ve determined the areas you need to monitor, mount your cameras strategically to maximize visibility and minimize blind spots. Make sure to include entry and exit points, storage zones, and any other areas that are vulnerable to theft or vandalism. You can also add additional cameras to fill in gaps or provide coverage for special events.
Monitoring
Regardless of whether a construction site is large or small, there are always security risks. From equipment theft to vandalism, surveillance cameras can help minimize those risks and protect valuable resources. In addition, surveillance can improve productivity and safety by encouraging employees to follow established processes and work efficiently.
However, selecting the right security camera system for a construction project requires careful consideration of the unique requirements of the project and the features offered by each camera type. When evaluating a security camera solution for a construction site, consider image quality, night vision capabilities, weather resistance, remote access, and more.
The ability to monitor a construction site remotely is an important feature for contractors and managers who are not always on-site. Look for systems that enable access via mobile apps or web interfaces and allow for real-time alerts to be sent to a user’s smartphone in the event of an intrusion or other security breach.
Additionally, make sure your chosen camera system is equipped with motion detection technology. This feature enables the camera to record only when movement is detected, saving storage space and reducing video recording times. Look for camera models that are durable and can withstand the harsh conditions typical of construction sites, such as rainstorms and scorching heat.
Cameras positioned at the entrance of a construction site can monitor the flow of traffic, ensuring that only authorized personnel enter and exit the site. They can also monitor adherence to safety protocols and prevent unauthorized actions by spotting individuals who fail to wear PPE or use proper equipment. CCTV footage can be used to investigate incidents and accidents on a construction site, helping to identify the causes and responsible parties.
Lastly, consider how easy it will be to install and reposition the cameras as the site grows or changes. Choose camera solutions that are simple to mount and set up, minimizing installation costs. In addition, look for options that feature power over Ethernet (PoE) for simplified cabling and efficient power delivery. Finally, be sure to notify everyone on-site that they are being filmed to create awareness and serve as a deterrent against unauthorized behavior.
Recording
The most effective construction security cameras are able to capture footage that allows operators or guards to respond quickly to any incidents. This ensures that crimes are taken seriously and prevented from escalating to larger problems, such as injuries or property theft.
Some camera systems include remote access, allowing authorized users to monitor sites and receive notifications on mobile devices when activities occur. This enables managers to stay updated on job progress even when they’re not present, helping boost productivity.
For maximum effectiveness, construction site cameras should be clearly labeled and visible to anyone entering the premises. This raises awareness and acts as a deterrent for would-be thieves, letting them know that their behavior is being monitored. It’s also a good idea to mark privacy-sensitive areas, such as restrooms and changing rooms, where individuals may have a reasonable expectation of privacy.
Cameras with motion detection features allow them to instantly send alerts whenever they sense any movement, making them a valuable tool for detecting break-ins. They can be used to monitor entire construction sites, or they can focus on entry points and other high-risk zones. They can even be armed with strobe lights and sirens to help deter unwanted visitors.
Some security cameras can be powered by solar energy, reducing operating costs while providing an eco-friendly solution. They’re also often easy to install, requiring only minimal wiring. This can be especially helpful for construction projects in remote locations where electrical infrastructure isn’t available. Some cameras also offer a variety of mounting options, including on poles or on scaffolding. They can also be integrated with access control systems, allowing employees to gain access to the premises using PINs or other credentials.
Choosing the right construction security camera system will depend on your budget and desired level of protection. Consider factors like camera resolution, recording capabilities, and remote monitoring to find a solution that’s right for your project.
In many jurisdictions, acquiring permits and permissions is necessary for installing surveillance equipment on construction sites. The process usually involves submitting detailed plans of camera locations and specifying data storage and privacy policies. Consulting with legal experts well-versed in surveillance and privacy laws can help you avoid any potential entanglements.
Why Roofing Maintenance Is Necessary
A regular visual inspection is necessary. It is essential to inspect the roof after severe weather and high winds.
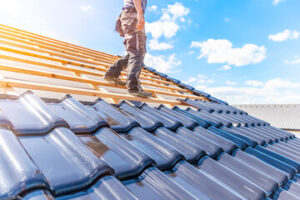
Home inspectors will check for leaks in the valleys, along with chimney flashing, and around skylights and vent pipes. They will also clean gutters and remove debris clogging the roof. Visit https://www.delaware-roofing.com/ to learn more.
Flashing is a waterproofing material that covers the most leak-prone spots of your roof, such as those around chimneys, vent pipes, dormers, valleys and skylights. While it’s an important part of any roofing system, it will wear down over time and require maintenance. In some cases, it may be as simple as resealing the edges, while other situations might require replacement.
Flashing usually appears as strips of metal trim, sealed with caulk. It’s often used around penetrations of the roof such as chimneys, vent pipes, dormers, walls and valleys to decrease moisture penetration, which would otherwise weaken the roof structure and lead to indoor mold problems.
It’s made from a variety of materials, including aluminium, copper, zinc alloy and lead. Lead is commonly used for flashing around chimneys as it has excellent durability and resiliency. It’s also durable enough to withstand the corrosive effects of acid rain and other environmental conditions.
Other types of flashing include step and counter flashing, which are typically mortared into brick or stone courses and run down to the shingles on either side. The metal flashing is then covered with caulk, a sealant that stops water from seeping through the penetration and into the inner roofing layers.
The flashing needs to be properly sized for the penetration. For example, the flashing around a vent pipe should be large enough to completely surround it. If the flashing is too small, the wind will drive rain under the shingles and into the house.
Roof flashing also requires regular resealing, especially along its edges. The caulk is a barrier that protects the flashing from water intrusion and rust, but it’ll degrade over time. You’ll notice signs of deterioration by looking for peeling, cracking, pitted spots or missing beads.
If you’re noticing any issues with your flashing, have it looked at by a professional roofer right away. They’ll inspect the situation and fix it before a leak develops. If left untreated, damage to the flashing could lead to structural damage, interior leaks and mold growth. Ultimately, this type of roofing problem is expensive to repair and can compromise the safety and integrity of your home.
Sagging
A sagging roof isn’t something you want to ignore. While it may not necessarily be an emergency, a roof that begins to sag can put the rest of your home or business at risk for structural damage and water damage. Oftentimes, it can lead to serious and expensive roofing repairs down the road if left unaddressed.
Generally, a sagging roof is caused by not having enough structural support for the load. This could be due to initial design flaws or shoddy workmanship during construction. Inadequate internal bracing, such as sagging joists and rafters, can also contribute to the problem. If you notice moisture stains on the ceilings or walls, it’s a good idea to call a professional right away to inspect your roof and determine what caused the sagging.
Another cause of sagging is excessive weight on the roof. Whether it’s from snow accumulation or a heavy building, excess weight can wear on the structure and cause a sagging roof over time. A roofing expert can determine what is causing the roof to sag and suggest ways to correct the issue.
In some cases, sagging can be fixed by replacing the damaged rafters or joists. This will provide more structural support and stop the roof from sagging in the future. In other situations, it may be necessary to reinforce the entire roof. This is usually done by attaching angled braces to the joists and rafters. Alternatively, jack posts can be used to raise the roof before adding any reinforcement.
Unless you have experience working at heights and are comfortable with using a ladder, it’s always best to let the professionals handle sagging roof inspections and repairs. Doing it yourself can result in injury to yourself or your family members and can even be dangerous if you’re not careful. A professional will ensure that you don’t harm yourself or the structure of your home or business and will provide a thorough, accurate diagnosis of the problem. They will also be able to help you decide on the best way to repair or replace your roof.
Debris
Debris from the storms that blow through your area can bruise and scratch the surface of your roof and damage shingles, flashing, gutter systems and even the structure of the building. It also can hurt anyone who works at the facility if it is blown around, posing serious injury risks.
In addition to causing structural damage, debris can also hide hazards from people who work on the roof and create other problems that are expensive to repair. A trip over a brick or a fallen tree branch could break an arm, and a hidden hazard like a loose nail could cause a fall that results in major medical bills, worker’s compensation and lost productivity.
Rooftop debris can come from a lot of sources, including natural and man-made disasters, construction sites and the environment. However, there are a few types of debris that can be particularly damaging to roofs.
When trees are nearby, leaves, twigs and branches will fall on the roof regularly. While these items may seem harmless, they can actually scratch and puncture the shingles and lead to early material deterioration. In addition, they can clog gutters and lead to water backflow under the shingles, resulting in leaky roofing.
If you have a wood-shingled roof, pine needles, bark and other organic debris will collect on the surface of the roof and in the guttering system. These materials retain moisture and can lead to rot, premature roof material deterioration and the formation of leaks and mold.
The type of debris that is most detrimental to roofs is metal, ranging from nails, screws, wire, tacks, and other small metal objects. While they may seem harmless, they can scratch the surface of the roof and cause stains that are difficult to remove. They can also clog guttering systems and allow rainwater to seep through the roof, causing damage to the attic and living spaces.
Debris is a common problem for all kinds of buildings, but it can be especially dangerous for those who work on or near the roof. The best way to prevent this type of debris from damaging your roof is to keep it clean, which requires regular maintenance.
Animals
As the saying goes, “an ounce of prevention is worth a pound of cure.” That’s certainly true when it comes to preventing animal roof damage. Many animals can cause extensive damage to your roof and home if they gain access, including raccoons, squirrels, birds, opossums, feral cats and mice.
These creatures have the physical strength and dexterity to rip shingles off of your roof and pry open attic vents and fascia boards. The damage they leave behind can lead to expensive leaks and mold growth. They can also gnaw through electrical wires and insulation, which could be dangerous for your family’s safety.
The most common sign of an animal infestation in your roof is the sound of scurrying, gnawing or scratching. This noise is typically heard in the early morning and evening when the animals are most active. Other signs to watch for include chewed or scratched areas on the roof, attic vents and soffits that are covered in debris or holes from animal entry.
Another area of concern is bird droppings. These can stain shingles and cause the surface to crack and discolor over time. They can also weigh down the shingle and weaken it. Additionally, they can attract insects that will feed on them and cause further damage.
One of the best ways to prevent animal problems is to trim tree branches that overhang your house. This will make it more difficult for these animals to reach your roof. Also, be sure to check your attic and gutters regularly for possible animal nests or holes. You can also install gutter guards to keep the critters out and use downspout extensions to help fend off animals from climbing up the downspouts. It is important to remember that these are only preventative measures, and not a permanent solution. Wildlife will still have a need for shelter, and they can be quite crafty when it comes to finding places in which to take refuge. That’s why it is recommended that you work with a local roofing contractor and animal removal specialist service to humanely remove the animal infestation.
Why You Should Get Your iPhone Repaired
Getting your iPhone repaired can be expensive, but it’s also worth the investment. Repair shops are highly skilled and have the tools to get your device back in working order.

If you’ve got a cracked screen or battery issue, consider having your iPhone Repair before it goes completely down. Here are a few tips for where to go and what to expect when you take your iPhone in for repair.
The screen on your iPhone is one of the most vulnerable parts of the device. It can get shattered by an accidental fall or hard bump against a rough surface. This is not the end of the world if you take the proper precautions to protect your phone.
However, if the screen breaks, it can make using your iPhone difficult or impossible. In this case, it is recommended to contact an expert for a repair service before the damage becomes more extensive.
A cracked or broken iPhone screen is a sign that there is an issue with the LCD (Liquid Crystal Display) layer of your device’s screen. This layer is responsible for displaying the program functions on your device’s screen so you can use them with ease.
When the LCD layer is damaged, it can be identified by black spots, discolored areas, or blurred sections on your screen. These may not be obvious until your device is on a dark background, but they are a sure sign that you should seek out the professional repair.
There are several ways to access your device without the need for a third-party tool, including the Find My iPhone feature in iCloud. If you have this feature, you can use it to unlock your iPhone remotely so that you can access it from a different location.
Another option is to use iTunes. This traditional Apple tool allows you to restore your iOS device and unlock it so that you can control and access it with a USB cable.
If you have a Mac computer, QuickTime is another way to get access to your device. This free media player on all Mac computers can be used to play videos and audio files, as well as capture the screen of your iPhone or iPad for display on your computer with no need for a third-party app.
Finally, if your iPhone is locked due to a broken screen, you can use VoiceOver. This feature is available on all iPhone models and is enabled by default for VoiceOver-aware users. To enable VoiceOver, press and hold the “Home” button until you hear Siri say, “Turn on VoiceOver.” Then, say “Hi Siri” or press the side button to activate Siri.
Water damage is a major concern for any iPhone owner. It can completely shut down your device and cause severe problems that may even render it unusable.
Fortunately, most newer phones have improved water resistance. While that’s a great thing, the problem is that those protective barriers aren’t foolproof. They’re only effective if you don’t let your phone get too wet in the first place.
If you’ve dropped your phone in the sink, shower, or a puddle, it’s important to immediately dry it off and take steps to prevent further liquid damage. You should remove any cases, sim cards, and other pieces of hardware that could be trapping water in your device.
Next, wipe off the exterior of your iPhone with a clean cloth or tissue paper. It’s also a good idea to use a can of compressed air or Q-tips to clean the interior of your phone from any water that might have gotten inside.
Once your iPhone is dry, you can check for water damage by looking at its liquid contact indicator (LCI). On newer iPhones, this is located in the headphone jack or charging port; on older models, it’s just above the side button on the right side of the phone.
When you see the LCI turn red, you’ll know your device is damaged. In this case, you should turn it off and book a repair appointment with an authorized technician such as iSmash to have it repaired in-store in as little as an hour.